

With tidying guru Marie Kondo recently admitting that her home is a mess, it seems the task of keeping the house clean can be a struggle for even the most expert organisers. It’s no secret that the benefits of having a tidy home outweigh the alternative but maintaining order at home need not be a daunting task.
30 day clean
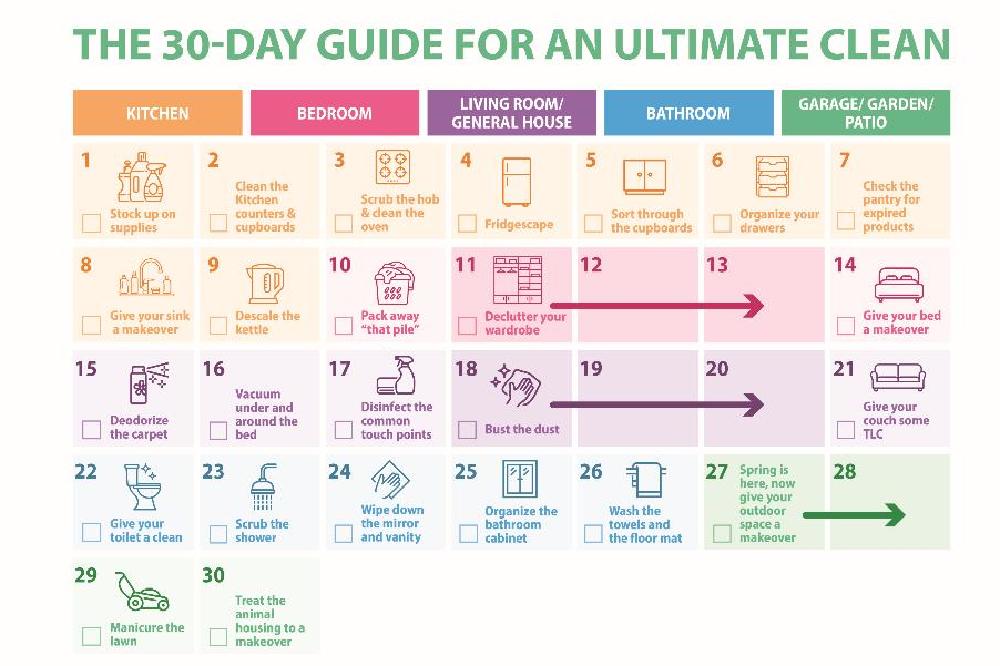
If you don’t know where to start, have little time in the day or just don’t enjoy cleaning but know it needs to be done, the experts at Henkel Laundry & Home Care have come together to create the ultimate 30-day deep clean programme. This will help you power through the deep clean for 20 minutes or less each day using minimum effort but achieving maximum results.
Before we get into the nitty gritty, get your cleaning playlist prepped and ready to help motivate you through your clean. Another top tip is to always start your day off by making the bed, as did you know it’s a proven fact that if you do, you are 206% more likely to become a millionaire, worth a try right?
Day 1: Stock up on supplies. There’s nothing more annoying than gearing yourself up for a clean and then realising you don’t have the right tools or products. Take a trip to the supermarket and visit the household cleaning aisle to stock up on rubber gloves, sponges and microfibre cloths, multi-purpose cleaners, anti-bacterial wipes, and other utensils you might need. It’s also worth - and aesthetically pleasing - picking up a mini basket to store all your products away neatly.
You can find a handy list of products we recommend at the end!
Area 1- Kitchen
Day 2: Clean the Kitchen counters and cupboards. Now that you have your cleaning supplies, lets tackle one of the dirtiest places in the house: The kitchen counters. Using a multi-purpose disinfectant spray, wipe down all of the kitchen counters so that they are clean and fresh for the rest of the spring cleaning ahead. While you’re wiping the counters, don’t forget to go over the cupboard doors and handles.
Day 3: Scrub the hob and clean the oven. When the oil splatters off the pan or the casserole leaks in the oven, more often than not, we leave it be. Well, not today. Today we rid our kitchen of the splatters and burnt crumbs that live on our oven. Make a natural DIY mix using baking soda and white vinegar which will tackle the build-up of fat, grease and traces of burns in no time, leaving you with a sparky clean oven to enjoy.
Day 4: Fridgescape. Give your refrigerator a makeover. Now that the counters are clean, it is the perfect time to empty the fridge and really give it a deep clean. Pull the food out (don’t forget to throw away any expired items in the process) and sit items on tea towels to not spoil your clean surfaces, with your multi-purpose spray, wipe down the inside of your fridge. After that, restock the fridge in a more organised manner and then pop in a fridge deodoriser which neutralises and absorbs odours, so it will continue to smell clean and fresh.
Day 5: Sort through that cupboard or cabinet where your kitchen pots and pans go to retire. Everybody has the one cupboard or cabinet where the pots and pans get thrown and within a couple of weeks is less organised than your childhood desk drawer. Take 15 minutes to pull out all of the pots and pans and decide which ones are still good to use, and which have had their day. Before popping the pans back, be sure to wipe down the inside of the cupboard while you’re there.
Day 6: Organize your drawers. Just like the cupboard of pots and pans, we all have the ‘random utensil drawer’ where the measuring cups, scissors, spatulas, and more get left. It’s time to sort through the drawer, declutter and reorganise the drawer so that you can easily find a teaspoon measure without having to rummage through.
Day 7: Check the pantry for expired products. Pull your cans and snacks out from the back of the shelves and give everything a quick check to ensure they are still safe to eat. This could spark some mealtime inspiration using items that are close to their use-by-date.
Day 8: Give your sink a makeover. Let’s be real, how often are we scrubbing our sinks or unblocking the pipes. Revamp both by using the boiling hot water, baking soda and vinegar trick to help clear the drains, then use your favourite disinfectant to bring your sink back to life/
Day 9: Descale the kettle. We all love a good cuppa. Maximise your kettle’s life by combatting that pesky limescale build-up. Grab an Oust All Purpose Descaler Sachet which works to removes the stubborn limescale in minutes, allowing your kettle to work more efficiently, and for you to save on electricity. It is important to descale appliances every three months in hard water areas and every six months in soft water areas.
Area 2- Bedroom
Day 10: Pack away “that pile”. We’re all guilty of having that one pile of clean laundry that we’ve “not got round to putting away”. It might live on a chair in the corner of the room or perhaps it is at the foot of the bed, or even still sitting in the dryer; wherever it resides, spend a quick 15 mins stowing the items away and you’ll be surprised what a difference it makes.
Days 11-13: Declutter your wardrobe. For the next 3 days, dedicate yourself to your clothes. Take a trip to your wardrobe and drawers and ask yourself what items of clothing you don’t wear anymore. As Marie Kondo would say, ‘ask yourself if it sparks joy’, if it doesn’t, donate these unwanted items to your local charity shop. You will be shocked at how much easier getting dressed in the morning is and how decluttered your wardrobe will feel.
Day 14: Give your bed a makeover. Studies show that people do not wash their sheets often enough. In fact, the average person only washes their sheets every 24 days rather than the recommended once a week*. Today, strip the sheets (that includes the duvet and pillowcases) and throw them into the wash with your bedroom blankets and a sheet of Colour Catcher, the number one laundry sheet in the UK which allows you to mix loads giving the best protection against colour run accidents, whilst also helping you save energy and water with every sheet used.
Tip: if your sheets are looking tired and dull, why not add a Dylon Dyes Machine Pod in your favourite colour to give them a new lease of life.
Day 15: Deodorize the carpet. Make your own DIY carpet deodoriser with apple cider vinegar and water or simply sprinkle some baking soda over the carpet to help get your carpet back to that ‘new carpet smell.’
Day 16: Vacuum under and around the bed. It can be hard to vacuum those harder to reach places. So today let’s focus on those very spots. Grab your trusty vacuum cleaner and prioritise under and around the bed, behind the chest of drawers, and even under your bedside table.
Added bonus: Because you deodorised the carpet yesterday, vacuuming today will truly leave your carpet feeling magical.
Area 3: Living Room / General house
Day 17: Disinfect the common touch points. Keep illnesses at bay by grabbing your preferred germ-busting disinfectant and wiping down your door handles, remotes and light switches to keep yourself and your home healthy.
Day 18-20: Bust the dust. For the next few days go around and dust all those forgotten places: the tops of the mantelpiece, the bookshelf, even inside your lampshades. Just because we can’t always see on top/inside of these areas doesn’t mean there isn’t an army of dust bunnies thriving. Pay close attention to the media centre, this is often the focal point of the room and although items like the TV, sound bar and family console are barely touched (aside from remotes) they tend to accumulate a good amount of dust. This will have your home free of dust, grime and allergens.
Day 21: Give your couch some TLC. Remove the cushion covers and the cushions from the sofa. Throw the covers into the wash and then grab your hoover and vacuum the cushions and the couch body. If you’re lucky, you may find a few quid that fell between the cushions!
Area 4: Bathrooms
Day 22: Take care of the best seat in the house. Give your toilet a much-needed detox and clean. To help you easily clean your toilet as often as recommended, you can opt for Bloo Brilliant Gel Rim Block, the rim block that prevents dirt from sticking leaving your toilet shiny and provides freshness with each flush.
Day 23: Scrub the shower. For today’s task, let’s tackle the grime that gets stuck to your shower walls. Take your favourite bathroom cleaner and a sponge and give those shower walls a rub. Don’t forget to rinse them down after! To get the best finish on your shower glass invest in a squeegee to keep your free of streaks.
Day 24: Wipe down the mirror and vanity. Whether your testing different makeup shades or it has just become a little dusty, every vanity and bathroom mirror needs a good clean. Create your own glass and mirror cleaner by mixing water, vinegar and dish soap to get it nice and clear.
Day 25: Organize the bathroom cabinet. Are there any empty toothpastes still hiding in there? Need to restock your floss? Take 15 minutes to clean and replenish your trusty bathroom cabinet.
Day 26: Wash the towels and the floor mat. Toss your tea towels, shower towels, and of course your fluffy bathroom floor mat and throw them in the wash so that your bathroom can be as inviting and fresh as a 5-star hotel.
Garage, Garden, Patio
Day 28: Spring is here, now give your outdoor space a makeover. It’s safe to say your interior is looking shipshape now. But now let's turn our focus to the garden. Prep your outdoor seating area by sweeping and ridding the patio of any leftover leaves and twigs, get rid of any cobwebs with a brush. Now that you’ve swept, refresh the outdoor seating area by using Jeyes 4-in-1 Patio & Decking Cleaner which will thoroughly clean hard surfaces and rid it of any algae, mildew, mould or dirt build up.
Day 29: Manicure the lawn. If you’re lucky enough to have a garden to enjoy in the warmer months, now is the time to grab the lawn mower and spend 15 minutes getting your greenery ready for spring and summer.
Day 30: Treat the animal housing to a makeover
It’s really important to keep your dog’s home clean and odour free – especially when they have one of the most powerful noses on the planet. Empty all the bedding and pop all the toys to one side, then give the inside (walls and all) a good clean with Jeyes Fluid Original. This will give the place a hygienic clean whilst removing any limescale and rust built up on metal surfaces. Once completed and bedding washed, put everything back and let your fury friend enjoy their very own outdoor space.
Tagged in Cleaning